Locally Signed Certificates With Mkcert
Published on 2023/01/01 by John Kosmetos
What is SSL, and why do I need it?
If you're building a website, wep app, or anything else that is served over the web, you're going to need a SSL certificate, to verify the identity of your site, and to encrypt the data being transferred between your server and the clients connecting to it.
It's worth noting that the SSL (Secure Sockets Layer) protocol has been supplanted by TLS (Transport Layer Security), a newer and more secure incarnation, but SSL has been in use for so long, that it's still referred to whenever web security is mentioned, so SSL and TLS are often used interchangeably.
The Problem
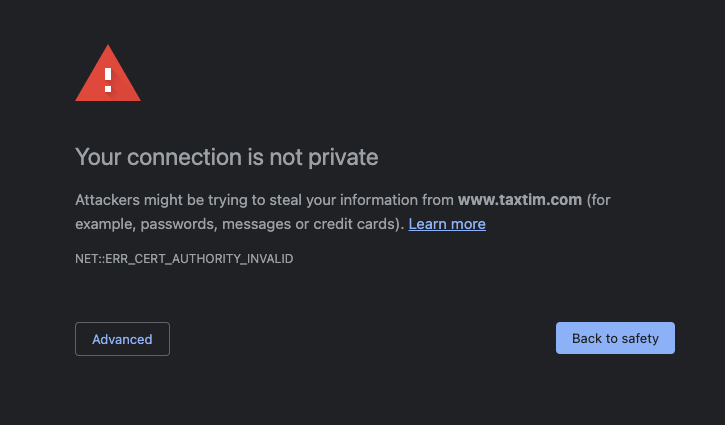
Ok, you've got an idea for a website, and you've just set up your local web server to start bringing it to life, most likely using Nginx or Apache.
You launch your browser, head to https://127.0.0.1/, expecting to be greeted by Hello World 🌍, but instead you see the following.
The Solution
To get rid of this eyesore, you're going to have to generate locally signed certificates, and configure your web server to use them, which under normal circumstances would be a lenghty, and painful process, but thankfully, we have mkcert to do all the heavy lifting! 🥳
In short, it creates and installs a local CA (Certificate Authority) that is then used to generate the aforementioned certificates.
Step 1: Install mkcert
Mac OS
Make sure Homebrew is installed, then fire up your terminal and run the following.
brew install mkcert
brew install nss # if you use Firefox
Linux
First, make sure certutil is installed, so depending on your distribution you'll run one of the following commands.
sudo apt install libnss3-tools
    -or-
sudo yum install nss-tools
    -or-
sudo pacman -S nss
    -or-
sudo zypper install mozilla-nss-tools
After which you can install Homebrew on Linux,then finally, mkcert.
brew install mkcert
Windows
Make sure Chocolatey is installed, then fire up your terminal and run the following.
choco install mkcert
Step 2: Install the local CA
Once you have mkcert up and running on your machine, you need to install the local certificate authority that will be used to generate all of your local certificates, by running the following command.
mkcert -install
After which you should see the following output.
Created a new local CA 💥
The local CA is now installed in the system trust store! ⚡️
The local CA is now installed in the Firefox trust store (requires browser restart)! 🦊
Step 3: Generate your locally trusted certificates
Assuming your website's URL is awesomesauce.com, navigate to your project's root and run the following to generate locally trusted certificates, utilising the CA we installed in the previous step.
mkcert awesomesauce.com "*.awesomesauce.com" awesomesauce.local localhost 127.0.0.1 ::1
Which should result in brand spanking new certificates in your current directory, and the following output! 😎
Created a new certificate valid for the following names 📜
 - "awesomesauce.com"
 - "*.awesomesauce.com"
 - "awesomesauce.local"
 - "localhost"
 - "127.0.0.1"
 - "::1"

The certificate is at "./awesomesauce.com+5.pem" and the key at "./awesomesauce.com+5-key.pem" ✅
Step 4: Update your server configuration
Once you have your new certificates, you'll need to update your web server to make use of them.
First things first, copy the certificates over into their respective directories.
# Copy over the cert file
cp ./awesomesauce.com+5.pem /etc/ssl/certs/

# Copy over the key file
cp ./awesomesauce.com+5-key.pem /etc/ssl/private/
Note: If you're using Docker, just mount the above directories into your web server container.
Apache (v2.4)
Make sure that the Apache SSL module is installed and enabled, then update your config file to make use of the newly generated cert files.
# /etc/apache2/sites-available/awesomesauce.com.conf

<VirtualHost *:443>
   ServerName awesomesauce.com
   DocumentRoot /var/www/awesomesauce.com/public_html

   SSLEngine on
   SSLCertificateFile /etc/ssl/certs/awesomesauce.com+5.pem
   SSLCertificateKeyFile /etc/ssl/private/awesomesauce.com+5-key.pem
</VirtualHost>
Nginx (v1.25)
Update the server block to make use of the newly generated cert files.
# /etc/nginx/conf.d/ssl.conf

server {
    listen 443 http2 ssl;
    listen [::]:443 http2 ssl;

    server_name awesomesauce.com;

    ssl_certificate /etc/ssl/certs/awesomesauce.com+5.pem;
    ssl_certificate_key /etc/ssl/private/awesomesauce.com+5-key.pem;
}
Time to test
If you haven't already, add the following lines to your hosts file to point your domain to your local machine.
It's typically located in the following locations, depending on your operating system.
- Mac OS & Linux -
/etc/hosts - Windows 10 -
C:\Windows\System32\Drivers\etc\hosts
127.0.0.1   awesomesauce.local
127.0.0.1   awesomesauce.com
127.0.0.1   www.awesomesauce.com
All done! 🎉 When you navigate to https://awesomesauce.com in your favourite browser, you should now be greeted with a lock symbol, indicating that the connection between your browser and website is encrypted and secure.